| by Jay Babina | Sculling |
||||||||
| Even "dry paddlers" can highly benefit from practicing the beginnings of the sculling brace. |
You have all seen pictures of "serious" paddlers sculling on the water yet this versatile technique is almost never taught. Most instructional books briefly describe the subject. Many advanced paddlers who can perform it aren't really sure how they arrived at that point of development. Instructional groups touch on it but never explore its potential.. When I first saw a paddler sculling, I became obsessed with it ...more so than rolling. It was obvious that if I could master it I would have much more security than just a roll and braces. This philosophy was recently reinforced as I watched a video of Greenlanders teaching skills filmed by Gail Ferris. In this video it's mentioned that the Greenlanders learn to scull before they learn to roll. I struggled with it for a full season until I could suspend myself on the water for a few seconds at a time. Only after a second season was I able to comfortably scull with my body on the water. This was after an obsessive practice routine and lots of failure. Little by little the necessary movements fell into place.
Why Scull?Sculling is really like a moving brace. Rather than leveraging yourself back to a state of equilibrium, the sculling movement provides a constant brace that allows you to maintain stability or defy it at will. Once it's mastered, you will be able to roll up with it or use it for partial assistance to your roll. In really confused seas it can bring your face to the surface to time the conclusion of a roll with the wave action. If you do find yourself in the water, a few sculling strokes will keep you on the surface rather than starting your roll from the bottom. Unlike rolling which is a black and white affair, (you're up or down) the sculling technique presents this transitional area that can be used independently or incorporated into other techniques. Like most of the other disciplines in kayaking, the benefits of the sculling technique will enhance all your other skills. The paddle movementThe sculling technique is a back and forth movement with the paddle. An upward climbing
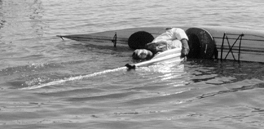
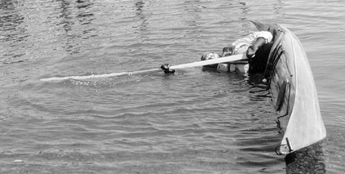
angle is The basic techniqueThe control hand (the one toward the water) is the one you use to gently turn the paddle back and forth. The other hand acts like a cradle. With the Greenland paddle, don't get in the habit of holding the paddle on the end. This will force you to hold the paddle end higher making for a more severe angle causing the paddle go deep rather than just beneath the surface. In both cases, the cradle hand should be close to your chest. Don't start lifting up or away from your body. Start by getting the motion going. Gently lean and put a little weight on the paddle. Be very conscious of your blade angle. The Euro- blade paddle should be skimming on the surface. Here's why most people fail. As they start to increase the weight on the paddle, they start to scull faster and loose the needed upward blade angle. This angle is what produces the lift. Ease the weight off and train your wrist to maintain the all-important climbing angle. "It's all in the wrist" couldn't be more true. Most paddlers want to get down to the water quick. It's just going to take a little time to develop. The big plungeIn a while you'll start to feel confident about really leaning on your sculling brace. A few times you scull down to the water and you sink like a rock. Here's why. Unfortunately there are two disciplines that you are going to have to train your wrist to perform. One is the sculling motion you have mastered. You are sculling with the paddle held like a high brace. As you eventually work your way down toward the water, the position of your body in relation to the paddle changes. You're body gets lower and lower while the paddle stays close to its original position. The new motion is like laying on the floor with the paddle over your face and sculling. Your wrist hasn't been trained for this position. Even experienced paddlers who have a good roll are frustrated by this one. The scull fails because once again, the paddle is going back and forth but the climbing angle is not being maintained.
The best way to get your body used to this position is on the beach. Practice in about 1 foot of water. Get in on your side so your shoulder is in the sand with the water level along your face looking up at the sky. You now can practice the movement and get the feel of looking up at the paddle. Keep your head immersed. Don't start lifting your neck. Lifting your head adds lot of weight on your body's attempts to float. Gradually work your way out deeper inch by inch. Keep your head in and allow the buoyancy of your PFD to assist you.
Don't forget your body floats (when it's in the water). Pay strict attention to the paddle angle ...that's what your trying to practice. In the shallows you can easily get yourself up in the sand. If you're using a Greenland paddle allow the bouncy of the wood to work for you. Get a lot of the paddle immersed with a very low angle to the water. Conventional paddle users can extend the paddle out by shifting your grip down the shaft or by holding the end of the blade as on a Extended Paddle Roll. This will also allow you to get the paddle low to the water surface. Not everybody is comfortable holding the blade, but for many it's a good way to get started. There's a distinct tendency to go faster as the weight on the paddle is increased. This is natural. However, try not to decrease the distance you're traveling back and forth. A good three foot sweep or better is about right. Many desperate and frustrated paddlers get the paddle going extremely fast with about a 1 foot travel only to find they sink. If you find you're working too hard, ease up and pay more attention to your climbing blade angle. If you have a roll, you can also set up, come around for your roll and scull on the surface instead. Wear a dive mask so you can clearly watch your paddle blade. Many times you'll come up to the surface but won't be able to sustain it comfortably. The ability to scull without straining will only come after the wrist movement is fully developed. Also watch for that subconscious attempt to lift your neck. Keep your head in the water with the water level across your face! Body languageThe third and equally important part of the technique is body and boat angle. As you gradually get lower and lower with your attempts, the boat wants to travel with you. When you're finally over on your side, you must push the boat angle away. Don't allow the kayak to topple over on you. The ideal position is to have the kayak leaning slightly back toward it's normal stance. Everyone's different and flexibility comes into play here. Most importantly, your bracing and fit in the kayak is key. Use your hips and thighs or feet to twist it away. In the beginning when you need every trick in the book, be conscious of this. Look inside other boats. Good paddlers always have them well padded which allow them to twist the boat and not slip out.
Generally narrow boats are easier to scull down to the water than wider ones. When the wider boat is on it's side, the distance between the cockpit coaming and the water is greater, forcing the boat to topple over on you as your body puts pressure on it. Even narrow boats with narrow cockpits can cause this pressure. However, once you master the technique, you'll be able to easily skull anything down to the water and back up.
Be patient with yourself in learning this valuable skill. Nobody learns
it quickly. Spend a lot of time practicing in the shallows. Once you master it, your
techniques will no longer be an exercise in survival but one of confidence and fluidity. Jay Babina is the designer of the "Outer Island Kayak" and has taught this technique to many paddlers. Photos of the author by Dean Bertoldi. |

 maintained which gives the paddle lift. The conventional blade paddle does
best on the surface while the Greenland paddle is best under the surface. You'll find the
Greenland paddle hard to keep under the surface due to the lift it creates. Likewise, the
Greenland paddle is much more forgiving of poor technique when sculling.
maintained which gives the paddle lift. The conventional blade paddle does
best on the surface while the Greenland paddle is best under the surface. You'll find the
Greenland paddle hard to keep under the surface due to the lift it creates. Likewise, the
Greenland paddle is much more forgiving of poor technique when sculling.